Continuing with our #MyCPHartStyle series where we ask interior designers and stylists to tell us how they go about planning their bathroom projects, the products they use, and what goes into the decision process, the spotlight is turned on London-based designer Tash South. A big believer that modern design brings ease and simplicity to our lives but ardent that modern doesn’t have to mean boring, Tash gives us an insight into her latest bathroom renovation.
Can you describe the bathroom renovation project? (i.e. what type of bathroom – cloakroom/family bathroom etc.)
This bathroom is one of two full bathrooms in our London home that we have been self-building for the past few years. The house has quite an unusual layout in that this bathroom is on the entry level, just off the hallway entrance, along with two bedrooms. The kitchen and main living areas are situated on the semi-basement level downstairs. Although it’s a family bathroom and one use predominately by the kids, because of its location, it is also used by guests. This dual-purpose impacted its design as I wanted to include some luxe, grown-up elements into the space, whilst keeping it practical for every-day family life.
How did you start the design process off?
As is the case with any project, I started with space planning. The bathroom isn’t a large room, stretching only 2m x 3m, so using the space cleverly was key. I wanted to increase the feeling of spaciousness and so I knew I needed to choose wall hung items wherever possible. I kept the walls simple with smooth polished plaster and recessed the mirror cabinet, in order to maintain this streamlined aesthetic. Alongside space planning, I created a working mood-board to refer to for style and purchasing. My design style is simple and modern with a real love for unusual texture, so greys in the form of polished plaster and encaustic tiles, accents of black, and natural brass all featured in my initial design plans.
What products did you finally select?
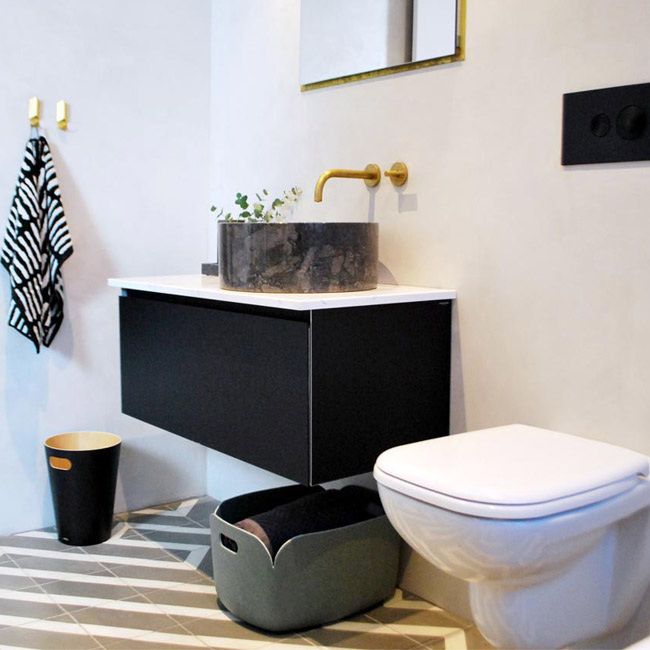
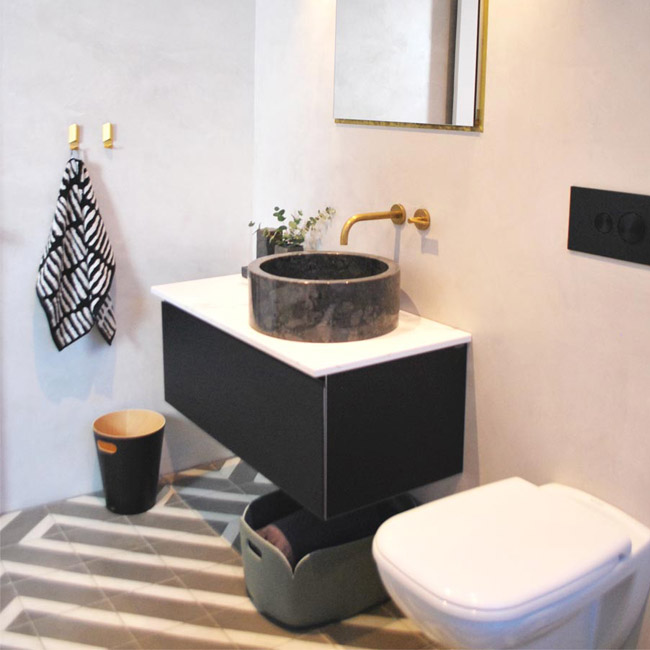
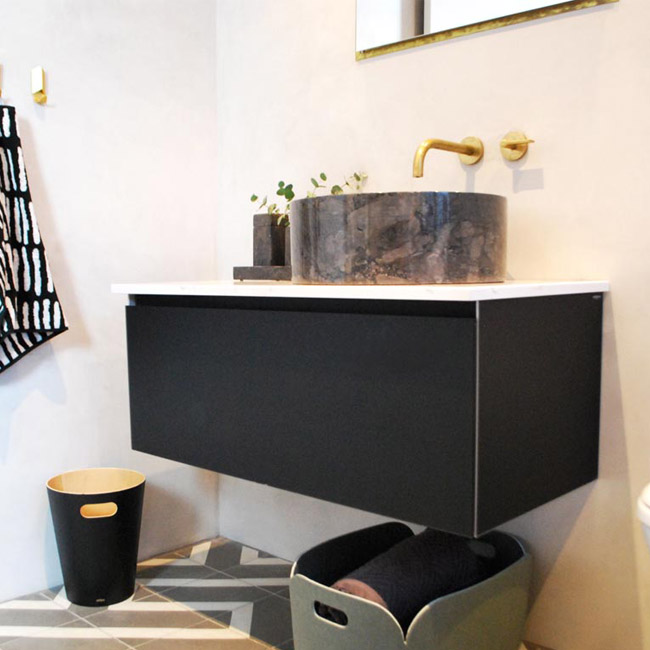
As mentioned, space-saving designs were crucial for this project, therefore I opted for wall hung items as they allow the eye to see the floor underneath, giving the illusion of a larger room. For the toilet, I selected the wall hung Duravit pan and the beautiful, yet practical, Artelinea vanity in matt black glass. The full-length Cordivari polished radiator with towel rail is a great multi-functional addition to this small bathroom, as it’s a heating source, towel warmer and full-length mirror in one. The Keuco recessed wall mirror cabinet has enough space to store all those bottles and potions whilst also hiding a shaver socket, but when closed, it looks like a simple mirror hung on the wall. The bathtub is Duravit Starck. All these items were found at C.P. Hart.
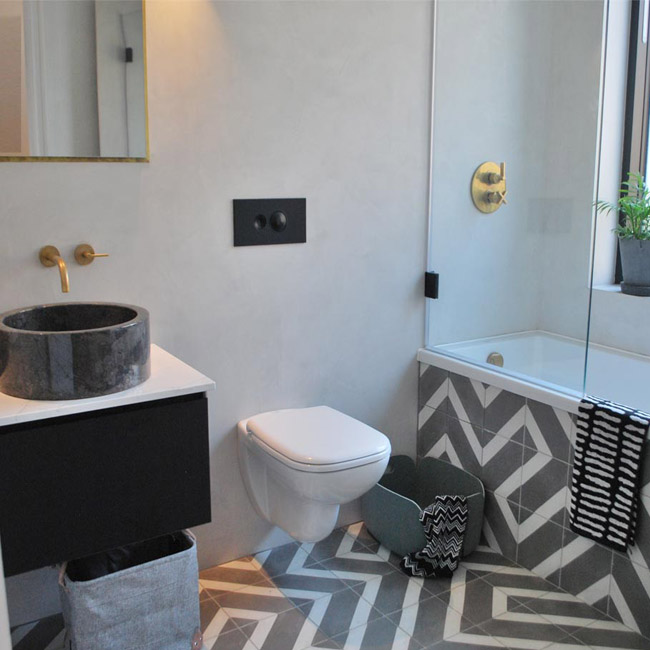
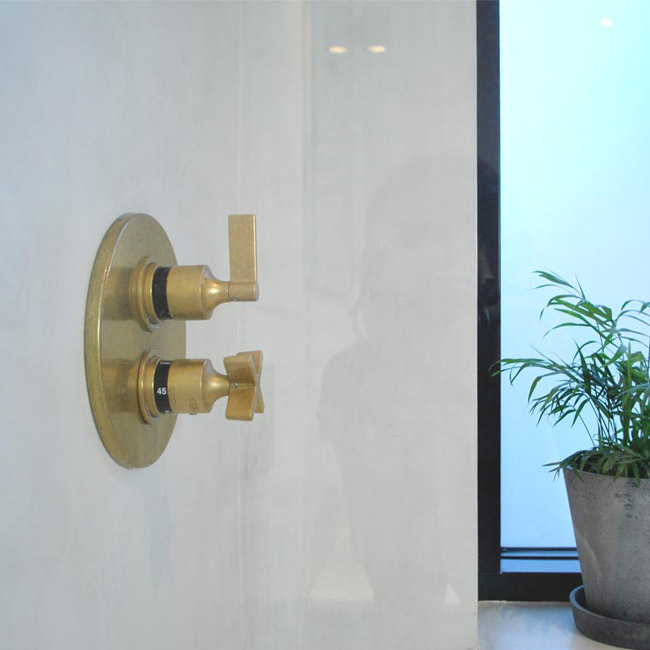
For the brassware, I opted for The Watermark Collection’s London Collection in tactile natural brass, which can either be left to tarnish naturally over time, or polished now and then for that shiny, brand new look. For the wall and floor finishes, I settled on the encaustic tiles from Bert & May first, then great effort was put into finding the right materials and plasterer to do the grey polished plaster on the walls. The colour was mixed bespoke by the plasterer to compliment the tiles. In every project, I love adding a bespoke craft element to a room as I feel it balances out the more modern elements well.
To add a touch of luxe, I introduced black marble into the basin and countertop, which is an off-cut from my kitchen worktops in Compac Unique Calcutta.
For the black accents, I had all the chrome elements, like the flush plate, towel rail and shower hinges, coated in matt black by a specialist coating company to match the black wall hung vanity and Astro wall lights.
Were there any problems along the way? If so, how did you overcome them?
When does a project every go precisely to plan! As this was a new-build house, every tiny detail had to be planned from the start, allowing plenty of room for error. As we quickly discovered, the house had not been set correctly, meaning the drainage for the whole top floor was slightly too high to use the angled pipes in place. This means the toilet is slightly higher than it should be and we had to install a pump under the bath to pump out the water. This means it’s a little bit noisy but far better than having a bathtub at hip-height!
What are your top tips for anyone wanting to re-design their own bathroom?
Plan, plan and plan some more! Getting it right from the start will save both time and money. On a practical level, ensure you’ve planned both the design and logistical elements for the project. Some items can take up to three months to be delivered and so it’s imperative you do your research and make sure each piece will arrive at the right time for installation.
The bathroom is your sanctuary, the place you can spend time relaxing and unwinding in. It is such an important room in the house to get right, so spend time choosing finishes and designs that reflect your personality and make you feel happy whenever you enter.
Why did you go to/use C.P. Hart in your renovation project?
I’d used C.P. Hart in a previous project for one of my clients and I found them to be incredibly helpful, professional and accommodating. The wide range of products and finishes they offer are second to none, and they are always ahead of the curve with the modern designs they stock.
What’s next for you?
The next project is finishing our en-suite bathroom. We had our second daughter last Summer, so building went on hold for a while. However, it is the final piece of the puzzle in the jigsaw that has been our self-build renovation. You can follow the upcoming progress on my blog at tashsouth.com, or on Instagram at @ms.tashsouth